Contact Robb Hammond for more information.
It has become necessary for all distributors of electronic components and manufacturers of electronic equipment to inspect all incoming electronic components for authenticity. This document has been derived from years of inspections at our facility and recent involvement in industry committees and symposiums related to the increase in counterfeit electronic parts activity. Our goal with this document is to inform you how to detect counterfeit parts and be confident in your evaluation.
Counterfeit electronic components are most prevalent in mainland China. Although we do not purchase from unauthorized distributors directly from that region, we continue to receive counterfeit parts on a weekly basis. Often the counterfeits supplied to us are from long time, good standing suppliers who are just not trained or prepared at avoiding counterfeit electronic components.
We will start with the most simple necessary tools to detect counterfeit integrated circuits. You will need all of the standard tools for handling electrostatic sensitive parts. For the detection of counterfeit parts you will also need a microscope with at least 30X magnification. It is also important that you have a camera built into your microscope. Some of the processes of counterfeit electronics detection require you to send copies of photos to different resources for their evaluation. In addition to a microscope you will need a solvent to check for part marking permanence. Acetone is a common chemical to determine if the part has been remarked, but a less harsh solvent is a combination of 3 parts mineral spirits and one part alcohol. This is the mixture that MIL-STD-883 (method 2015.13) requires part markings to withstand.
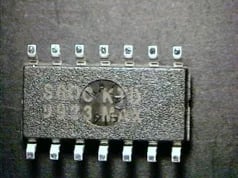
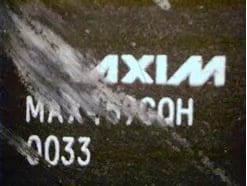
To begin avoiding counterfeit electronic components we start with a visual inspection of all of the packaging. Some of the signs to look for are:
- Misspellings on the manufacturers labels
- Verification that the date code on the label match dates codes on the parts
- Date codes that are not possible. ex. 0657
- Date codes that are in the future
- If parts are moisture sensitive they require a dry pack and a Humidity indicator card. Often the counterfeiters forget some piece of the moisture sensitive parts requirements. Part specific requirements can usually be found on the datasheet.
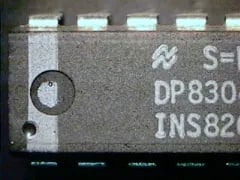
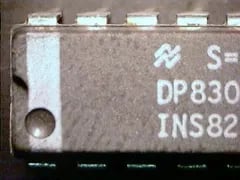
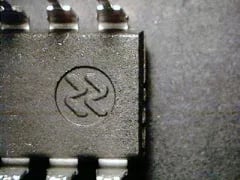
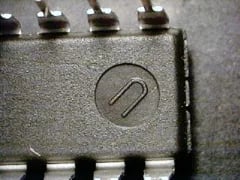
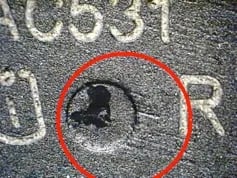
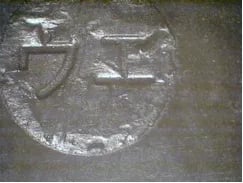
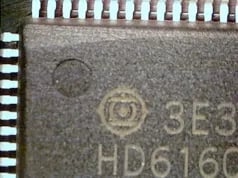
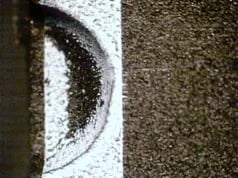
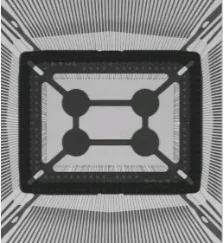
Examination of the Indents
Most plastic integrated circuits have cavities purposefully made during the mold process. Some of them are pin one or other designations for use in part placement, but others are just part of the plastic mold process. Mold cavities should be clean, according to the manufacturers we have spoken to. Examining these indents is our number one way of detecting counterfeit components. The counterfeiters have a very difficult time keeping the indents clean and consistent during their refinishing process. The pictures to follow are examples of what we have received in our warehouse and a small explanation of our observation follows.
Again you can see differences in the indents. The indent to the lower left looks similar, but the middle right indent is not apparent on the bottom part. This seems to occur because the counterfeiters sand down the parts to remove the old markings and then they resurface it with a process called “blacktopping”, which often fills shallow cavities.
The indents are always clean and uniform from the manufacturer. This indent has been filled in with the materials used to cover up the old surface.
We are assured by the manufacturers that we speak with that they are very strict with their standards when manufacturing parts. Paint in the indents is not where it is intended, therefore it is suspect counterfeit.
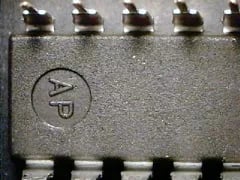
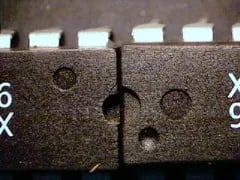
These 3 parts are all marked identically on the top. The indents of these 3 have completely different markings. Not only are they different, but they do not follow any pattern. It is not uncommon on legitimate parts to see similar patterns that are not identical. For example, it can be a legitimate part if you had product, that like the first one had 2 letters in the indents, but they were different letters. It could have “”BP” on another part and not be a threat of counterfeit material. It is the same with the 3rd picture. You may have a “T” on another part without cause to worry.
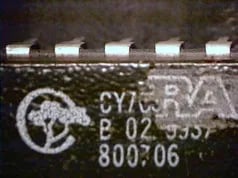
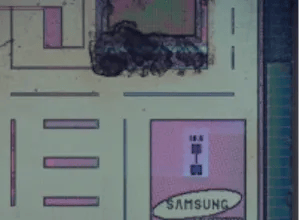
Countries of Origin
Most parts, which are large enough to write a country of origin, display where it was manufactured somewhere on the part. It is commonly placed in the indents, but it can be written anywhere on the part. Smaller parts often have codes within the lot codes for country of origin information, which makes it difficult to use as a deciding factor. We have done investigations with the component manufacturers and all of them we have spoken to say that a part with the same lot code as another cannot be manufactured in different countries. See the pictures to follow for examples.
Same lot code on top. Manufactured in separate countries.
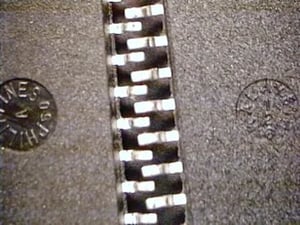
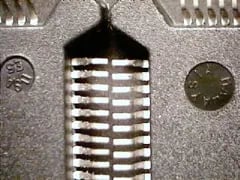
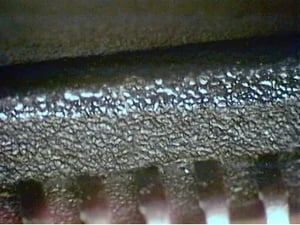
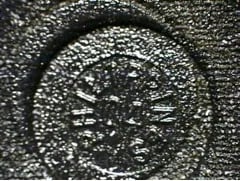
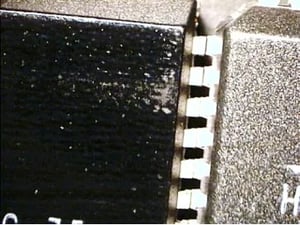
Texture

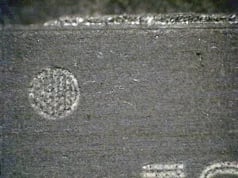
On the above 2 pictures I want to focus on the directional sanding marks. Parts coming straight out of a mold will not have any marks the have a directional pattern. These types of marks are made when the counterfeiters are sanding off the top or bottom markings to prepare the part for blacktopping. Again, you must have a microscope to see this type of inconsistency. It is not visible with the human eye.
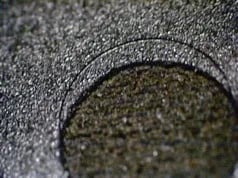
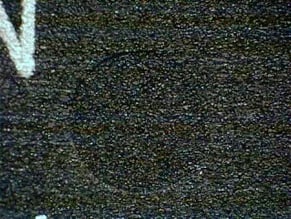
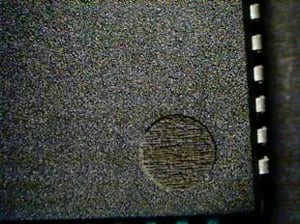
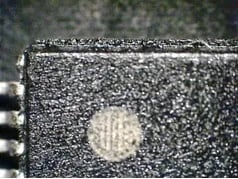
The more samples you see you should start to be able to see the difference between an original surface and a fake one. The glare on the main surface tells us that there is a high possibility of blacktopping. The fine glass and plastic that the molds are generally produced with do not shine like this part. This is another indent created to visually fool those who are relying on their naked eye for inspection. The error that they made creating this circle is visible and the texture inside of the circle is neither smooth nor similar to the rest of the part.
This is a similar example, but here you can see that they have attempted to re-stamp over the existing stamp. Most likely they did this to cover up different countries of origin.
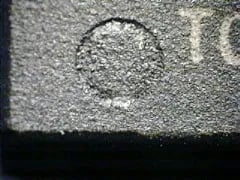
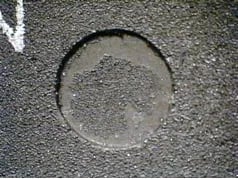
This is a close up of how the surface of the part should look. It is very hard to see in pictures, but through a microscope the differences between a typical fake and an authentic part can best be described as; the surface of a true part has a sharper and duller look. The glass in the mixture makes for sharp little peaks and valleys, whereas, when painted with the blacktopping material the peaks and valleys are smoothed over and filled in, like if you were to put a coat of paint on sand paper. This picture and description are not relevant to every part, but the majorities have this type of finish. There are some legitimate parts that have smooth plastic finishes that must not have glass in the mixture.
Plastic Electronic Components are typically made with a mix of fine glass and plastic. The surface of the molded package is textured when it is removed from the mold. The pin cavities are often very smooth as you can see in the previous picture. The counterfeiters have come up with a very good mixture to create a very similar surface on top of the original surface. With the naked eye it is almost impossible to determine the difference between the original surface and a fake surface. By taking a close look through the microscope there are many signs that can help you determine the authenticity of a component. See the pictures to follow for examples.
This is one of our most amazing discoveries. This very shiny, smooth, but orange peel type finish was not natural looking. You need to start to be able to tell an authentic texture from a fake. This one made it a bit easier because it was so different. We decided to try to scrape the thick looking blacktop off and we found this Altera logo under the Cypress marking.
Resistance to Solvents
In the beginning of this document we mentioned a solution to check for marking permanence. This part is the same as the previous picture after an acetone wash on the right hand side. It is very obvious that there was some sort of a top coat on top of the molded plastic. If you wash the part with one of the suggested solutions and you see a different texture or the marking wipes off you can be fairly certain you have a counterfeit.
AFTER: This is the same part after being washed with acetone. You can see some light sanding marks, but this looks more like an original surface of a legitimate part.
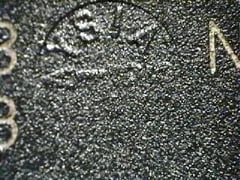
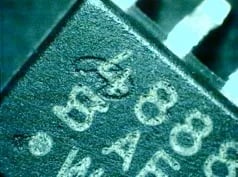
Imperfections
All of the manufactures, which we have spoken to, state that they have high quality standards which preclude them from major imperfections. The part numbers are to be in a certain location on the part and they are not to be crooked, misspelled, or out of alignment. The logos are also monitored very closely and should not vary from part to part. In addition, the markings are to withstand tough environments and still be legible.
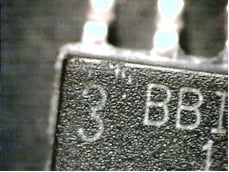
The character in the far left is supposed to be a “B”. We also noticed they have etched some extra marks, towards the top, that are filled with the same color used to display the part number.
Here again, the marking is not where is should be. The manufacturers will tell you that they do not allow this in their production.
The marking on this part was very crisp and clear. The leads looked a little used, but the markings looked straight out of the manufacturer. The surfaces looked legitimate so the only other visual check we could perform was marking permanency. We used MIL-STD-883 standard 3 parts mineral spirits and one part alcohol and the part number wiped right off.
Internal Characteristics
The counterfeiters have gotten much better doing their external work, therefore if the parts are for a high reliability application it is important to inspect the internal characteristics of the part. The equipment and personnel to perform the internal testing are much more advanced, therefore more costly. The most important internal evaluations are Decapsulation to see that at least one of the die in the lot is correct, then X-ray inspection of a large sample of the balance of the lot to confirm that the entire lot is all the same.
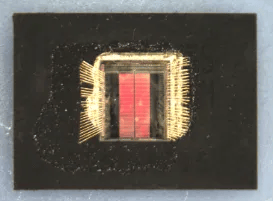
Confirmation of a part through decapsulation.
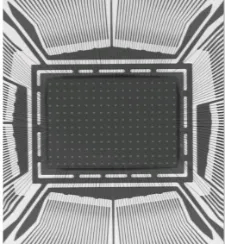
Suspect counterfeit example X-rays of two parts with the same part number and lot code with different internal characteristics.
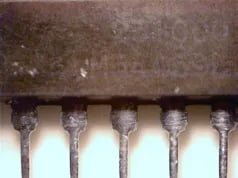
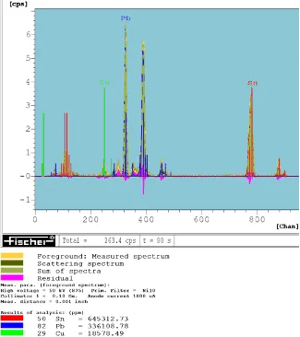
Physical Composition
Another helpful process to confirm a parts authenticity is through identifying if the leads are constructed with correct material. Counterfeit parts can be either re-tinned to cover up previous use or constructed with a different material due to the fact that the part is not the actual part as marked. This test is performed by an XRF Analyzer (X-ray fluorescence). Below is an example of a report from our XRF Analyzer which we would compare its results with the manufacturers specifications.
Conclusion
After reading this document in it’s entirety you will have a much better chance of detecting counterfeit electronic components. Counterfeit parts threaten every facet of our industry. It is important that we work together to stop the problem. Please share this document with everyone you do business with in the industry. Feel free to contact me or any of my staff with questions.
Author Robb HammondKeep your line running. Our sourcing experts will find the parts others can't.
GET A QUOTE